Tutorial AWS Lengkap: Belajar EC2, S3, dan IAM dari Nol
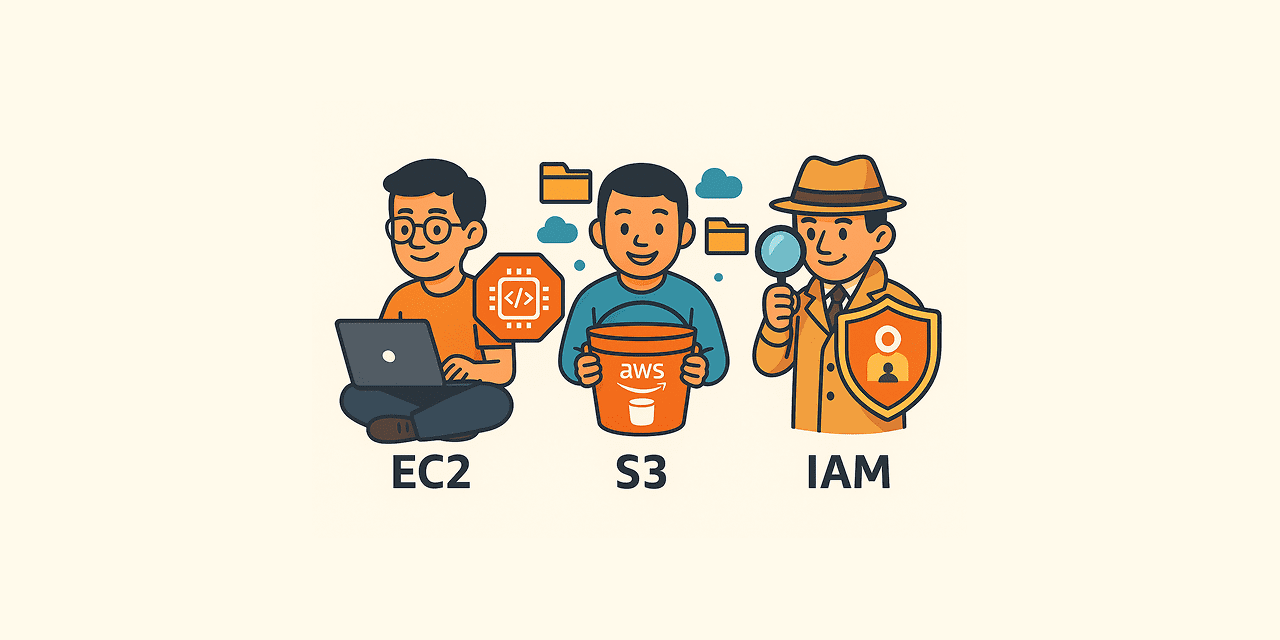
Belajar AWS paling efektif kalau langsung praktik. Pada panduan ini kamu akan membuat IAM User, menjalankan EC2 Instance, menyiapkan S3 Bucket, lalu menghubungkan EC2 ke S3 menggunakan IAM Role.
Setiap langkah ditulis detail sesuai urutan nyata yang sudah dijalankan: mulai dari IAM User → EC2 → S3 → IAM Role → Tes Upload. Disertai penjelasan menu yang dipilih, opsi yang diaktifkan, hingga hasil akhir yang diharapkan. 🔥✅
🧱 Persyaratan
- Akun AWS aktif (pakai Free Tier bila memungkinkan).
- Pilih region terdekat (contoh yang kamu pakai: ap-southeast-2 – Sydney/Singapore) – bebas untuk region. 🌏
1) Buat IAM User untuk Login (bukan Root) 🔐
Console path: IAM → Users → Create user
- User name:
masdika-lab. - Centang Provide user access to the AWS Management Console.
- User type: pilih I want to create an IAM user (bukan Identity Center).
- Console password: pilih Autogenerated password.
- Centang Users must create a new password at next sign‑in.
- Set permissions (Step 2):
- Untuk lab, pilih Attach policies directly lalu centang:
AdministratorAccess✅IAMUserChangePassword✅
- Untuk lab, pilih Attach policies directly lalu centang:
- Review and create → klik Create user.
- Simpan sign‑in URL, username, dan password sementara.
- Login ulang ke Console pakai
masdika-lablalu ganti password. (Aktifkan MFA setelahnya). 🔒
Outcome: Punya user non‑root untuk semua langkah selanjutnya.
2) Launch EC2 Ubuntu (Web Server) 🖥️
Console path: EC2 → Instances → Launch instance
- Name:
masdika-lab-ec2. - AMI: Ubuntu Server 24.04 LTS (Free Tier eligible).
- Instance type:
t2.micro✅. - Key pair:
Create new key pair→ downloadmasdika-lab.pem. - Network settings:
- Auto-assign public IP: Enable.
- Security group (baru):
- SSH (22) → My IP ✅ (lebih aman dari Anywhere).
- HTTP (80) → Anywhere (0.0.0.0/0, ::/0) 🌍
- (Opsional) HTTPS (443) → Anywhere.
- Storage: default 8 GB (gp2/gp3) → cukup.
- Klik Launch instance → tunggu status Running + Status checks: 2/2 passed.
Ambil Public IPv4 dari detail instance.
SSH dari komputer:
chmod 400 masdika-lab.pem
ssh -i masdika-lab.pem ubuntu@<EC2_PUBLIC_IP>
Jika “Permission denied (publickey)”: cek key, aturan SG (SSH=My IP), dan
chmod 400sudah benar.
Install web server:
sudo apt update && sudo apt install -y nginx
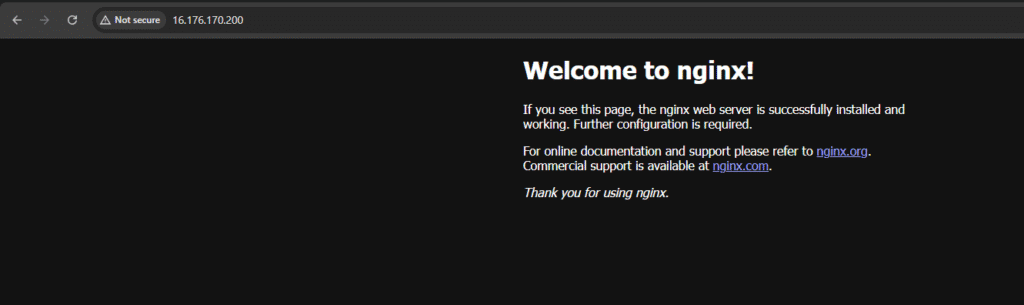
Uji di browser: http://<EC2_PUBLIC_IP> → tampil halaman default Nginx ✅
3) Buat S3 Bucket untuk Static Website 🪣
Console path: S3 → Create bucket
- Bucket name:
masdika-lab-bucket(harus unik global). - Region: sama dengan EC2.
- Object ownership: ACLs disabled (recommended).
- Block Public Access: uncheck “Block all public access” → ketik confirm.
- Default encryption: pilih SSE‑S3 (default). (Bucket Key abaikan/Disable).
- (Opsional) Versioning: Disable untuk lab.
- Klik Create bucket.
Upload file (di dalam bucket): Upload → Add files → pilih index.html.
- Storage class:
Standard. - Server-side encryption (per object): Don’t specify (cukup SSE‑S3 default bucket).
- Klik Upload.
Aktifkan Static Website Hosting:
Properties → Static website hosting → Enable- Index document:
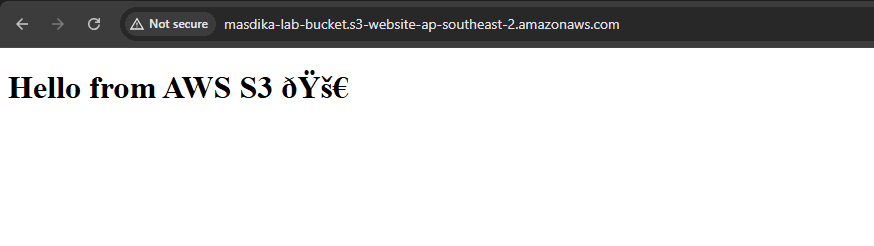
index.html. - Catat Website endpoint contoh:
http://masdika-lab-bucket.s3-website-ap-southeast-2.amazonaws.com
Jadikan objek bisa dibaca publik (Bucket Policy): Permissions → Bucket policy → tempel JSON:
{
  "Version": "2012-10-17",
  "Statement": [
    {
      "Sid": "PublicReadGetObject",
      "Effect": "Allow",
      "Principal": "*",
      "Action": "s3:GetObject",
      "Resource": "arn:aws:s3:::masdika-lab-bucket/*"
    }
  ]
}
Uji: buka Website endpoint → halaman index.html tampil ✅
Kalau 403 AccessDenied: biasanya lupa uncheck Block public access atau policy belum disimpan.
4) Buat IAM Role agar EC2 Bisa Akses S3 (Tanpa Access Key) 🎫
Console path: IAM → Roles → Create role
- Trusted entity type: AWS service.
- Use case: EC2 → Next.
- Add permissions: centang
AmazonS3FullAccess(untuk lab → mudah dites). - Role name:
EC2S3Role→ Create role.
Pasang role ke instance:
EC2 → Instances → pilih instance → Actions → Security → Modify IAM role → pilih EC2S3Role → Update.- Cek tab Security → kolom IAM Role sudah terisi
EC2S3Role.
Tes dari EC2 (CLI):
# kalau belum ada CLI
sudo apt update && sudo apt install -y awscli
# tampilkan daftar bucket
aws s3 ls
# kirim file uji ke S3
cd ~
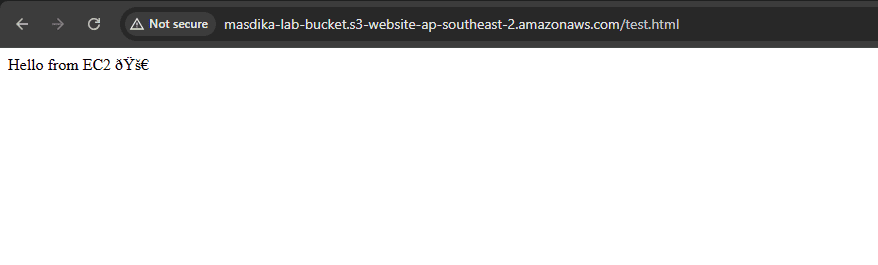
echo "Hello from EC2 🚀" > test.html
aws s3 cp test.html s3://masdika-lab-bucket/
Uji di browser: http://<endpoint-website>/test.html → tampil teks Hello from EC2 🚀 ✅
5) (Opsional) Ganti ke Policy Minimal (Bucket-Scope) 🧰
Agar lebih aman daripada AmazonS3FullAccess, buat policy khusus bucket ini saja.
Policy JSON (minimal akses):
{
  "Version": "2012-10-17",
  "Statement": [
    {
      "Effect": "Allow",
      "Action": ["s3:ListBucket"],
      "Resource": "arn:aws:s3:::masdika-lab-bucket"
    },
    {
      "Effect": "Allow",
      "Action": ["s3:GetObject", "s3:PutObject", "s3:DeleteObject"],
      "Resource": "arn:aws:s3:::masdika-lab-bucket/*"
    }
  ]
}
Langkah: IAM → Policies → Create policy → JSON → Paste → Name: EC2S3BucketOnly → Create → attach policy ini ke EC2S3Role, lalu hapus AmazonS3FullAccess dari role.
✅ Ringkasan Hasil
- IAM User
masdika-labuntuk login aman (bukan root) 🔐 - EC2 Ubuntu (t2.micro) + Nginx berjalan 🌐
- S3 Static Website aktif dengan bucket policy 📄
- IAM Role EC2S3Role sukses → EC2 upload ke S3 tanpa access key 🔗
🧹 Cleanup (biar hemat biaya) 💸
- Terminate instance EC2 kalau sudah selesai.
- Empty & Delete bucket S3 (hapus objek dulu baru bucket‑nya).
- Hapus IAM Role/Policy yang tidak dipakai.
- (Opsional) Hapus Security Group dan Key Pair kalau memang khusus lab ini.
💡 Troubleshooting Cepat
- 403 AccessDenied di S3 → Block Public Access masih ON atau policy belum benar.
- 404 di S3 website → nama file bukan
index.htmlatau salah path. - SSH gagal → Security Group SSH bukan My IP, atau
chmod 400belum dijalankan. awscommand not found → instalawsclidulu.- Tidak menemukan “Modify IAM role” → pastikan pilih menu
Actions → Securitypada instance yang benar.
Selamat! 🎉 Kamu sudah menyelesaikan lab dasar AWS mencakup Compute, Storage, dan IAM. Lanjutannya kamu bisa tambah CloudFront (CDN + HTTPS), RDS untuk database, atau CodePipeline untuk CI/CD. 🚀
Lab ini disusun dengan pendekatan praktis step-by-step, sehingga bahkan pemula bisa langsung mengikuti tanpa bingung. Kita mulai dari menyiapkan akun AWS…
Amazon EC2 (Elastic Compute Cloud) adalah layanan cloud dari AWS (Amazon Web Services) yang memungkinkan kamu untuk membuat dan menjalankan…